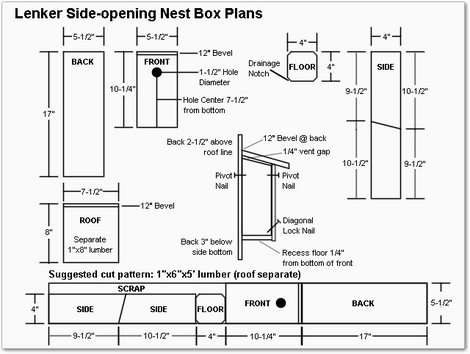
Instructions for the Lenker Bluebird Box:
1. Cut all boards to lengths indicated and acquire all required hardware.
2. With two 1 5/8′ screws fasten the front to the left side. Keep the top of the side 1/4″ below the top of the front, (important for proper cross-ventilation).
3. With two 1 5/8″ screws fasten the back to the side keeping the side 2 3/4″ from the top of the back, (important for proper cross-ventilation).
4. Place the bottom between the front, back, and side 1/4″ up from the bottom edge of the box: with one 1 5/8″ screw fasten the front to the bottom; with one 1 5/8″ screw, fasten the left side to the bottom; and, with one 1 5/8″ screw fasten the back to the bottom.
5. Place the right side, angled side to the top, between the front and back leaving 1/4″ space below the top of the front and the top edge of the side, for ventilation. Make a mark about 1″ down from the top of the front. Using a square, make a mark, exactly the same height, on the back edge. This is the height where the nail or screw will be placed to make the hinge for the door. Nail in the first nail through the front and into the middle of the right edge of the side board. Next nail the second nail through the back into the right side, again into the middle of the edge. The side will open for monitoring the nestbox from this hinged opening.
6. With two 1 5/8″ screws fasten the top to the back keeping the roof 1/4″ above the side for ventilation. Fasten two 1 5/8″ screws through the roof into the top edge of the front.
7. With a drill bit larger diameter then a #6cc nail ( or other nail to be used as the door lock) drill at a 45 degree angle downward through the front and into the door side. The door lock will be placed in this hole to secure the side and to allow easy monitoring access by removing the nail, the angled hole is required to ensure the nail does not come out on its own.
8. Make small kerfs cut with a saw or deep scratches wit a nail on the inside of the front, below the hole, in order to make a ladder, which will make it easier for the baby birds to climb to the hole to get out (fledge).
9. Set your box out and get ready for bluebird nesting season!